 Windows Media Center turns your ordinary PC into an all-in-one home entertainment center to watch and record TV programs, play DVDs, listen to music, share your digital photos, and more. In this first part of a two-part article, Wei Meng-Lee shows you how to build a Media Center PC from scratch.
Wednesday, December 06, 2006
Build Your Own Media Center PC, Part 1
Windows Media Center turns your ordinary PC into an all-in-one home entertainment center to watch and record TV programs, play DVDs, listen to music, share your digital photos, and more. In this first part of a two-part article, Wei Meng-Lee shows you how to build a Media Center PC from scratch.
Monday, October 30, 2006
Take Your Apps Far and Wide with a GPS Tracking System
You already know that GPS is used extensively in a wide variety of mobile devices in order to track delivery and service vehicles—or any other mobile fleet. This kind of application is not as difficult as you may at first think. Find out how to use Visual Studio to create a GPS tracking app, with maps, that runs on Windows Mobile Pocket PC devices.
Wednesday, October 18, 2006
Brand new XBOX 360 Core System for sale!
 I have two brand new sets of the XBOX 360 Core System for sale. If you are interested, drop me an email (wei_meng_lee@hotmail.com) and state your offer price. Unfortunately, due to shipping, I can only offer this to people based in Singapore.
Fun with RFID
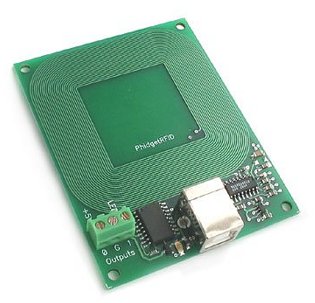 A Radio Frequency Identification (RFID) system is an identification system that uses radio waves to retrieve data from a device called a tag or transponder. RFID surrounds us in our daily lives-in supermarkets, libraries, bookstores, etc. RFID provides a quick and efficient way to collect information, such as taking stock in a warehouse, as well as tracking the whereabouts of items.
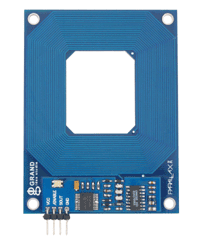
In this article, you will learn how to build a Windows application that incorporates RFID technology for data collection. I’ll demonstrate how to use two RFID readers and then I’ll compare their relative pros and cons.
Building an Enhanced Security System with a Web Cam and a Servo
 Once you crack the surface of what's possible using .NET to control hardware devices you may find yourself quickly sucked in to this kind of programming. In this article, learn to control a Web cam mounted on a servo to create a sophisticated monitoring application.
Simplify Dependent Lists with the Microsoft AJAX CascadingDropDown Control
 Simplify Dependent Lists with the Microsoft AJAX CascadingDropDown Control
In many Web applications, when a user selects an option from a dropdown list, the set of options on another list must change, a challenge known as the "dependent list problem." The CascadingDropDown control solves the problem with aplomb.
Thursday, September 28, 2006
Build a low-cost TTL-to-RS232 level shifter
A helpful reader of my articles, John R. Mortarelli, sent me a message on how to build a low-cost TTL-to-RS232 level shifter:
"For those with a little electronic circuit board know how, here are a couple of webpages that show how to construct for low cost ($5) a TTL - to - RS232 level shifter. http://www.zero-soft.com/HW/RS232/ and [PDF] RS232/DB9 An RS232 to TTL Level Converter ".
Thanks, John!
"For those with a little electronic circuit board know how, here are a couple of webpages that show how to construct for low cost ($5) a TTL - to - RS232 level shifter. http://www.zero-soft.com/HW/RS232/ and [PDF] RS232/DB9 An RS232 to TTL Level Converter ".
Thanks, John!
Wednesday, September 27, 2006
Add Drag-and-Drop Magic to Your Web Pages Using Microsoft AJAX Library
 Sometimes it seems like AJAX is a layer of magic for web pages. The ability to drag and drop page "widgets" such as images and chunks of text is definitely one of those features that makes people's eyes light up. Find out how easy it is to enable client-side drag-and-drop using Microsoft AJAX Library (Atlas).
Wednesday, September 20, 2006
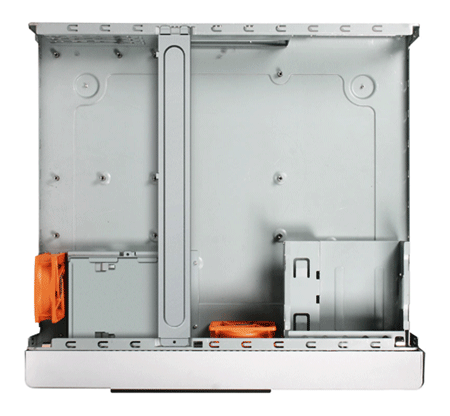
Review - Media Center Case: Thermaltake Mozart SX
Another media center case that I reviewed was the Mozart SX from Thermaltake (Thanks, Imei!). If you are looking for a slimmer casing for your media center, then the Mozart SX VC7000 series from Thermaltake ($250) is a good candidate.
 The Mozart SX has the following features:
 If you are using a micro-ATX motherboard, you need to purchase the optional upgrade kit A2423. This kit contains a PCI-E riser card and PCI riser card.
 The Mozart SX has the following features:
- Pithy aluminum front panel design
- Slim type DVD style and pithy aluminum front panel design
- Built-in Media LAB kit with hot keys module:
- Media LAB Hoy Keys function
- Media LAB application CD and remote control
- Media LAB VFD panel
- Superb multimedia capability
- Full ATX & Micro ATX & Mini ITX compatibility
- Fits Standard PSII PSU
- Front I/O ports for easy access
 If you are using a micro-ATX motherboard, you need to purchase the optional upgrade kit A2423. This kit contains a PCI-E riser card and PCI riser card.
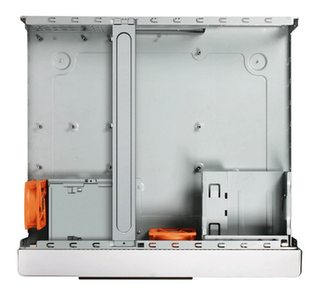
Review - Media Center Case: Antec Fusion
I recently embarked on a project to build my own Windows Media Center. Thanks to Antec (thanks Susie!), they sent me the Antec Fusion for review.
 The Antec Fusion ($219) is the newest member of the LifeStyle family of enclosures from Antec. It is a very solid and beautifully crafted enclosure designed for those who want to integrate their media center with the audio systems. It features the following:
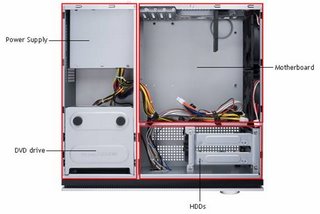 Due to the design of the Antec Fusion, adding or removing drives (DVD or HDD) is very easy. However, do note that only micro-ATX motherboards are supported.
 The Antec Fusion ($219) is the newest member of the LifeStyle family of enclosures from Antec. It is a very solid and beautifully crafted enclosure designed for those who want to integrate their media center with the audio systems. It features the following:
- Aluminum plate front bezel with Vacuum Fluorescent Display (VFD) and Volume Control to work with media center applications. The VFD displays useful information (controlled by an application shipped with the Antec Fusion), such as RSS feeds, system information, graphic equalizer, email, etc. The Volume Control directly controls the volume of your Windows XP operating system.
- Triple chamber structure to separate heat and noise of power supply, hard drives and motherboard for cooler and quieter operation.
- Quiet high-efficiency 430 Watt ATX12V v2.0 power supply with universal input and active PFC.
Removable HDD brackets with extra soft silicone grommets to reduce vibrational noise. The silicone grommets effectively quiet down my noisy Seagate hard drive and make it virtually silent. - Advanced cooling system: 2 x side-mounted 120mm TriCool™ 3-speed fans. The two fans have variable speeds and their speeds can be adjusted using the attached switch – low, medium, and high.
- 3 Drive Bays
Front Accessible: 1 x 5.25" (for a DVD drive)
Internal 2 x 3.5" (for HDDs) - 4 Expansion Slots
- Supports Micro ATX form factor motherboards(9.6" x 9.6")
- Front-mounted ports for easy multimedia connections – 2 x USB 2.0, 1 x IEEE 1394, Audio In and Out
 Due to the design of the Antec Fusion, adding or removing drives (DVD or HDD) is very easy. However, do note that only micro-ATX motherboards are supported.
Monday, September 18, 2006
Incorporating Search into your Windows Applications using the Google SOAP Search API
 We have reached a point where it is almost impossible to work effectively without using a search engine to look for information; and Google has played a pivotal role in this aspect. The good thing about Google is that is also exposes a set of APIs to developers so that you can incorporate search functionality into your application with ease. In this article, you will learn how to incorporate the Google Search into your Windows application.
Get Started with the Google Maps API Using ASP.NET
 Using the Google Maps API, you can embed the popular Google Maps into your Web pages using Javascript. In this article, I will show you how to get started with the API.
Make Your AJAX Apps Wiser Using Auto-Complete Functionality in Atlas
 The whole point of AJAX is to make things faster, so why not include functionality that completes your users' thoughts as they type? In Atlas you can easily implement auto-completion functionality using the AutoCompleteExtender control.
Tuesday, September 12, 2006
Using Data Compression in .NET 2.0
 New compression classes are available in the .NET Framework 2.0, and they can be used to reduce the size of data transmitted over a network. In this article, I show you how to use the compression classes in .NET 2.0 in a web service environment.
Incorporating Search into your Windows Applications using the MSN Search API
 Not wanting to be left behind by all the major search engines such as Yahoo! and Google, Microsoft has also entered the market with its own search engineMSN Search. This article will show you how to incorporate the MSN Search into your Windows application.
Monday, September 11, 2006
Taking iPod on the Road
 The battle for the MP3 players have never been more intensified. With so many different players jostling for a place in the market, it is interesting to bet who the eventual winner is. Of course, the incumbent winner is definitely Apple’s iPod. To see the amount of industry support and interest for this Apple product, you just need to look at the number of accessories designed specifically for the iPod.
And so lately, sick of swapping CDs in my car’s limited 6-disk changer, I decided to hook my iPod to the car and do away with the in-car disk changer. The two criteria that are important to me are:
* Power charging. As iPod runs out of juice pretty quickly, it is a necessity for me to charge it on the road.
* Connect to my in-car stereo without needing to modify my car.
Fortunately, there exist many different solutions that meet my requirements. First, for the power you can use the Belkin Auto Charger for iPod (see Figure 1).
 Figure 1. Belkin Auto Charger w/Audio for iPod
For iPod music playback in your car, there are generally two solutions:
* Use a Car cassette adapter, or
* Use a FM transmitter
According to feedback from a number of users, using a car cassette adapter actually produces better sound quality than using a FM transmitter. You simply plug one end of the adapter into your iPod and slide the cassette adapter into the cassette player in your car. The Sony Car Cassette Adapter is one of them (see Figure 2). Figure 2. The Sony Car Cassette Adapter
For the FM transmitter, it basically broadcast the music from your iPod using one of the selected FM frequencies. To listen to the music, you need to tune your car stereo to the designated frequency. The Griffin iTrip FM transmitter (see Figure 3) connects to the top of iPod and draws its power from the iPod and transmits the music over the selected FM frequency.
 Figure 3. The Griffin iTrip FM Transmitter
Lately, there seems to be a wave of new all-in-one car accessories for the iPod. These all-in-one accessories combined a charger and a FM transmitter into one, making it convenient for car owners. The Monster iCarPlay Wireless is one of them (see Figure 4). Figure 4. Monster iCarPlay Wireless - FM Transmitter for iPods
After a long search at the local Apple Stores, I settled for an all-in-one solution from Griffin – the Griffin RoadTrip. The Griffin RoadTrip is both a charger and a FM transmitter for iPod and iPod Mini.
In this article, I will share with you my experience of setting up the Griffin RoadTrip in my car and how you can use your car stereo to play music stored on your iPod.
What You Need
Here is a list of things you need:
* Griffin RoadTrip (http://www.griffintechnology.com/products/roadtrip/)
* 3rd/4th Generation iPod or iPod Mini
* Car (of course!)
The Griffin RoadTrip cost about $80. For this article, I used my 3rd generation 20 GB iPod. The Griffin RoadTrip connects to the cigarette lighter of your car. Figure 5 shows the main parts of the Griffin RoadTrip.
 Figure 5. The Griffin RoadTrip
Let’s examine the various parts of the Griffin RoadTrip in more details. Figure 6 show the cradle with the removable FM radio transmitter module.
 Figure 6. The cradle with the FM Transmitter Module
The nice feature about the Griffin RoadTrip is the ability to remove the FM radio transmitter module. Figure 7 shows the cradle with the module removed.
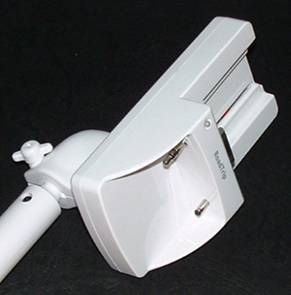 Figure 7. The cradle with the FM Transmitter Module removed
Using the included cables (see Figure 8), you can connect the FM radio transmitter module to your computer so that the audio output is broadcasted over the FM frequency. One limitation of this is that the radio module requires an external power (drawing from the USB connection from a computer) and it is unable to draw power from an iPod directly. This prevents you from connecting the module to the iPod directly.
 Figure 8. The FM Transmitter Module with cables
The Griffin RoadTrip comes with a holder to hold your iPod (see Figure 9). It also doubles up as a belt clip. Depending on the size (and thickness) of your iPod, you may need to stick the included protection pad to the holder so that it can snugly fit your iPod. Figure 9. The iPod holder/belt clip with the protection pad
For iPod Mini users, use the clip holder for the iPod Mini instead (included in the package, see Figure 10).
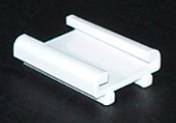 Figure 10. Clip holder for iPod Mini
Figure 11 shows my iPod in the holder.
 Figure 11. The iPod in the holder
With the iPod in the holder, you can now sit it in the cradle (see Figure 12).
 Figure 12. The iPod in the charging cradle
Mounting the Griffin RoadTrip
With the components all set up, it is now time to mount it in the vehicle. First locate the cigarette lighter outlet (see Figure 13). Depending on the make of your car, the positioning of your cigarette lighter outlet may affect your positioning of the Griffin RoadTrip.
 Figure 13. Locating the cigarette lighter outlet
One thing I realized when I was mounting the Griffin RoadTrip is that with the extension arm it feels really fragile, especially when you are driving. And so I removed the extension arm and mount it into the cigarette lighter outlet (see Figure 14).
 Figure 14. Mounting the Griffin RoadTrip
There were some reviews on the Web that mentioned the Griffin RoadTrip obstructing the gear shifts, but for the Nissan Sunny, this is not a problem (see Figure 15).
 Figure 15. The Griffin RoadTrip does not obstruct the gear shifts of my Nissan Sunny
Once the Griffin RoadTrip is mounted, simply turn on the Griffin RoadTrip by pressing and holding the Quick Key (see Figure 16) button. Select a frequency to broadcast the music on your iPod by pressing the Frequency Down/Up buttons.
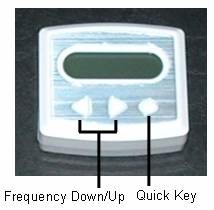 Figure 16. The buttons on the FM radio transmitter
Turn on your car stereo and then tune in to the designated frequency. You should now be able to hear the music from your iPod!
Summary
Overall, the Griffin RoadTrip is easy to set up and use. However, if you are particular about sound quality, I need to tell you that some hissing noise can be heard when you are playing from the iPod. However, I find it acceptable and at least I can now hit the road with the company of my favorite songs!
Voice and Sound Recording on your iPod
Apple’s firmware for the iPod does not come with any recording capability (unless you buy a third-party recorder). However that does not mean that you are stuck with this limitation forever. If you are limited by Apple’s firmware for the iPod, change it!
Recently I came across the iPodLinux project (http://www.ipodlinux.org/Main_Page), an open source venture dedicated to porting Linux to the iPod. The iPodLinux project uses uClinux (http://www.uclinux.org/), a special variant of the Linux kernel that does not require a MMU (a memory management unit).
The cool thing about iPodLinux is that many additional applications have been written to run on the iPod, adding many capabilities not found in Apple's firmware. The iPodLinux replaces the UI of the iPod with 'podzilla' (http://www.ipodlinux.org/Podzilla
), the default user interface for iPodLinux.
In this article, I will show you how to install iPodLinux onto your iPod and how you can use it to do voice and sound recordings. Note that iPodLinux is currently only supported on 1st, 2nd, and 3rd generation iPods. Fourth generation iPods (includes iPod Mini, U2, iPod Photo, and iPod Shuffle) support are upcoming, but not available at the moment.
Installation
You can download the various installers of iPodLinux for the different platforms – Linux, Windows, and Mac, from http://www.ipodlinux.org/Installation.
For my case, I downloaded the Mac-version of the installer and Figure 1 shows the installer after the installer package was expanded.
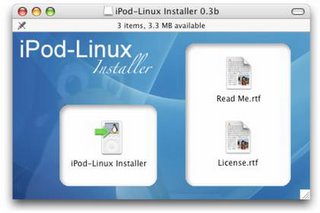 Figure 1. The iPodLinux installer
Before you actually start, you need to ensure that you have enabled your iPod for disk use. This can be enabled in iTunes->Preferences…->iPod (see Figure 2; check the Enable disk use check box).
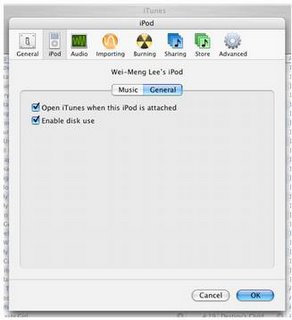 Figure 2. Enabling your iPod for disk use
Launch the iPodLinux Installer and select the iPod that is connected to your Mac (see Figure 3).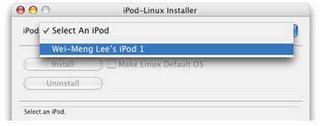 Figure 3. Selecting the iPod to install iPodLinux
To install iPod Linux onto your iPod, click the Install button (see Figure 4). Once installed, you have a choice to boot using iPodLinux, or the original iPod firmware (boots by default). If you want to boot iPodLinux by default, check the Make Linux Default OS checkbox.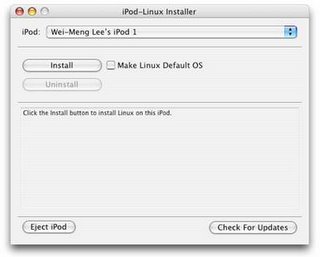 Figure 4. Installing iPodLinux
If the iPodLinux Installer complains that it is unable to install iPodLinux onto your iPod because of some unrecognized format error, you can solve this problem by “reformatting” your iPod using the iPod Updater (from Apple). However, be aware that when you use the iPod Updater, you are essentially destroying whatever content (and songs) you have on your iPod. Thus, remember to backup your iPod before you proceed. The iPod Updater can be downloaded from: http://www.apple.com/ipod/download/. You can then use the iPod Updater to restore your iPod to the original factory setting by clicking on the Restore button (see Figure 5).
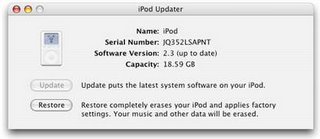 Figure 5. Restoring an iPod to its factory settings
You can now return to the iPodLinux Installer to install iPod Linux onto your iPod. When it is done, you should see the screen as shown in Figure 6 (note that my iPod’s name has been changed after a restore operation).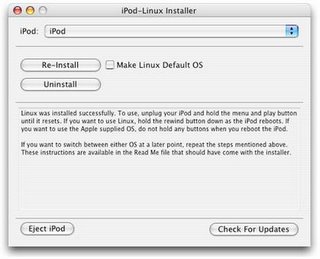 Figure 6. Successfully installing iPodLinux
To boot into iPodLinux, press and hold the Menu and Play buttons (1) at the same time and when the iPod is rebooting, press and hold the rewind button (2). Figure 7 shows the buttons combination.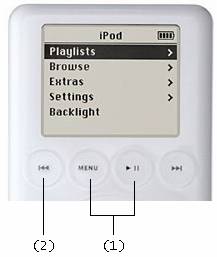 Figure 7. Buttons combinations for booting into iPodLinux
You should now see the Penguin logo on your iPod (see Figure 8), confirming that iPodLinux is installed successfully on your iPod.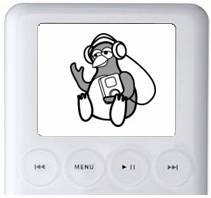 Figure 8. iPodLinux booting
You will also see the familiar command line (for those Linux users), as shown in Figure 9.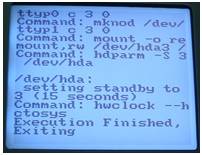 Figure 9. The command line interface of iPodLinux
You should now see podzilla on the opening screen (see Figure 10). The UI looks very similar to Apple’s UI, but with some new functionalities beneath the menu.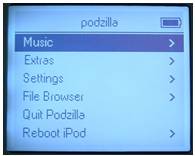 Figure 10. Podzilla
Voice Recording
Recording is one feature that is sorely missing in iPod (unless you buy third-party accessories such as the iTalk). Using the iPodLinux, you can go to the recording feature by navigating to Extras->Recordings (see Figure 11).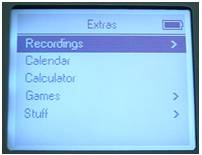 Figure 11. The Extras menu
You have two choices for recording – Mic Record (for use with a microphone) and Line In Record (for use with sound sources such as the audio-out port on your Mac). You can also select the sample rates – 8 kHz, 32 kHz, 44.1 kHz, 88.2 kHz, and 96 kHz (see Figure 12). Figure 12. The Recordings menu
To record voice, you can connect an external microphone to the iPod headphones port and use the Mic Record option. Alternatively, if you do not have an external microphone, you can use your iPod earphones. Yes, this is not a typo; your earphones can be used as a microphone! My experimentation tells me that the left earphone record sounds much clearer than the right earphone. Try it on your own earphones and see if it works!
Once the voice is recorded, you can press the Menu button to return to the Recordings menu and select Playback to hear what you have just recorded. The recording is saved as a .wav file and the latest recording is listed at the bottom. Select the one you want to listen to and press the Action button (see Figure 13).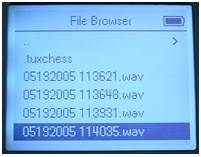 Figure 13. Playing back recorded sound
Transferring Songs from iPod to iPod
Besides recording voice, you can also transfer songs from one iPod to another. I tried playing a song on my iPod photo and then use a connector cable to connect it to my iPod (see Figure 14). The iPod records the song using the Mic Record method (the Line In Record method does not work). However the quality of the recording wasn’t that great – there was some hissing noise.
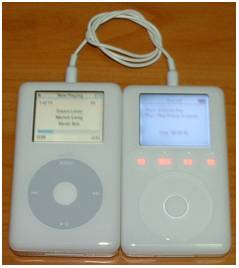 Figure 14. Transferring a song from iPod photo to iPod
However, you need to be aware of the legal issues when you are transferring songs using this method. You are essentially copying songs and so you need to ensure that you have the rights to do so.
Recording Radio to iPod
Another cool use of the recording feature of iPodLinux is for recording radio programmes. You can connect your iPod to the radio’s line-out port and then use the Line In Record method to record the radio programme. Besides the radio, recording directly from your Mac is another possibility. I tried playing a song in iTunes and then use my iPod to record through the line-out connector (again, you need to be aware of the legalities of doing this). The sound quality is pretty good and clear.
Summary
I hope you have a lot of fun using iPodLinux. Be sure to explore the other aspects of iPodLinux, such as games, and other cool applications located in the Extras menu. Have fun!
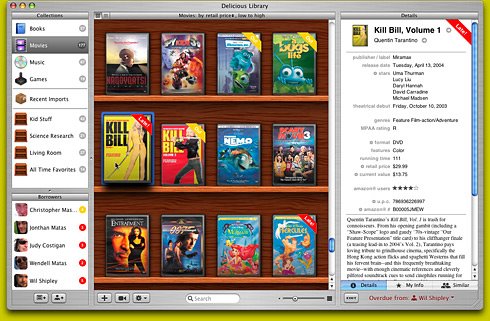
Review: Delicious Library for Mac OS X
 If you are a book-lover (or a DVD collector) like me, you would no doubt have a huge collection of books. The problem that most people encounter is how to really organize their collections. People in the early days use spreadsheets to keep track of what titles they have, but doing so is really a hassle as you have to key in all the data yourself.
 Recently I came across a very cool cataloguing application that prompted me to revisit my desire to organize my home library again. And so, in this article I am going to walk you through the Delicious Library application ($39.95) from Delicious Monster (http://www.delicious-monster.com/). Delicious Library is a Mac OS X application that catalogues your personal collection of books, DVDs, CDs, and games. It does so by scanning the barcode of the item and then access the Amazon.com web service to fetch the detail information of the item.
Barcoding Scanning using your iSight or Webcam
The first thing that the Delicious Library really impresses me was its ability to scan in barcodes using your iSight camera. However, if you do not have an iSight camera, fret not. You can still use your Webcam to scan in barcodes. You would however need to do some work to get your Webcam to work in Mac OS X (refer to my earlier article at http://www.macdevcenter.com/pub/a/mac/2003/12/23/usb_webcam.html on how to do this).
Once Delicious Library is installed, click on the Video Barcode Scanner button (see Figure 1) located at the bottom of the screen to start scanning your items!
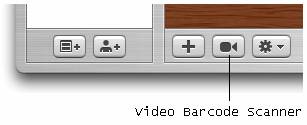
Figure 1. Click on the Video Barcode Scanner to start scanning your item
The first time you try to scan in a barcode requires some effort. For me, I placed the Webcam on the desk and held the item upright (in this case a book; see Figure 2). The trick to getting the book scanned is to do this in a brightly lit place and make sure that you keep your book still in order for the barcode to be captured successfully.
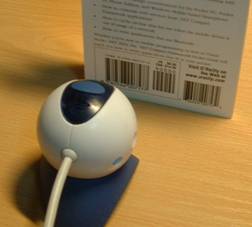
Figure 2. Scanning a barcode using the webcam
Ensure that your barcode is crossed by at least one of the red lines (see Figure 3). If you hear a beep sound, then the barcode is scanned successfully.

Figure 3. Scanning a barcode
Once the barcode is scanned, the Delicious Library will query the Amazon.com web service for the details of the item. As the querying may take some time, you can continue scanning other items while it is waiting for the result of the last query (see Figure 4).
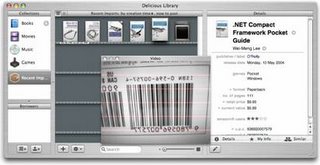
Figure 4. Fetching the information of an item from Amazon.com
Overall, I find the scanning very fun once you mastered the scanning process. However, there are at times where I had difficulty in scanning some books. If you do not have an iSight or a Webcam, I suggest you buy the Flic Bluetooth-enabled Scanner (see Figure 5) from Delicious Monster at a cost of $174.95 (when buying together with the Delicious Library license, which I think is a very reasonable price for a Bluetooth scanner). The best thing about using this scanner is that you can scan your books by going to them, rather than bringing all the books to the desk. This is especially useful if you have a large library and removing them from the shelves is too cumbersome. What’s more, even if you wandered beyond the 10 meters radius imposed by Bluetooth technology, the scanner has built-in memory enough to capture 500 barcodes which you can import into the Delicious Library when you are back to your desk.
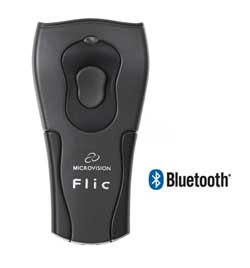
Figure 5. Using the Flic scanner together with Delicious Library
Besides scanning, you can also enter items the traditional way using the keyboard. Click on the Add a new item button at the bottom of the screen (see Figure 6) to add a new item.
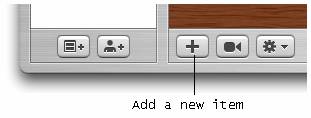
Figure 6. Adding a new item to your library
There are four methods for you to enter a new item (see Figure 7):
- Search from Amazon.com
- Enter the barcode of an item
- Manually enter the item info
- Scan using an iSight camera or Webcam
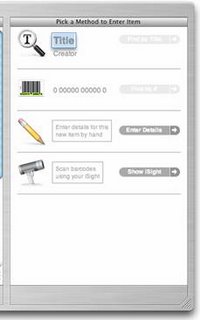
Figure 7. Various ways of adding an item
Searching for an item in Amazon.com is an easy way for you to add items to Delicious Library. Simply enter the title or/and author you want to search for and click on the Find by Title button located to its right (see Figure 8). When the result is returned, simply click on the “+” icon to add it to Delicious Library.
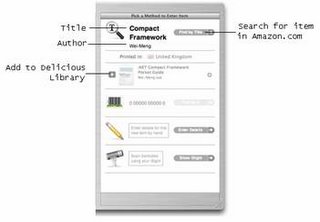
Figure 8. Searching for an item from Amazon.com
Once the items are scanned/entered, you can sort them according to a wide range of categories (see Figure 9). By default, the items are sorted by creator (e.g. authors).
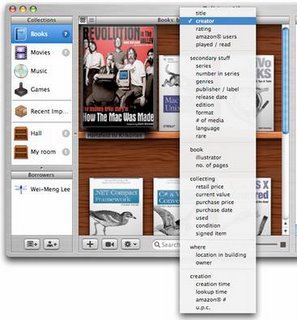
Figure 9. Sorting the items according to category
What made Delicious Library stand out from other application in the same genre is its amazing graphics effect. The cover image downloaded from Amazon.com is rendered to give it a realistic look, just like your real books (or DVDs) on the shelves. The Delicious Library can display your items (see Figure 10, 11 and 12) in a variety of sizes. The rendering of a DVD cover is most impressive (see Figure 12).
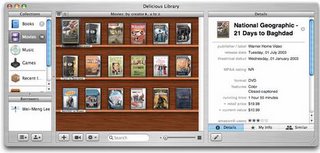
Figure 10. Displaying in the smallest size
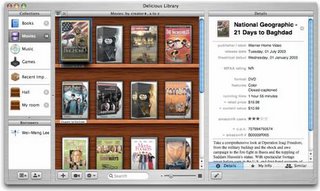
Figure 11. Displaying in small size
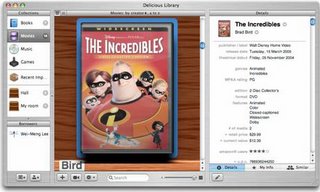
Figure 12. Displaying in the largest size
My only gripe with Delicious Library is that book covers are not displayed in the correct proportions. For example, the dimension of the book “Revolutions in the Valley” is 7.9x8, but Delicious Library displays it in the conventional rectangular format (see Figure 13), causing the image to be distorted. Also, sizes of all the books seem to be the same, which is definitely not the case in the real world. However, DVD does not face this problem as most DVDs are packaged in the same dimension.
You can also create virtual shelves that allow you to organize the location of your items. This is useful if you store your items in many different places, such as your study room, kitchen, etc.
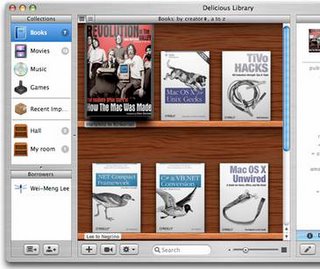
Figure 13. All the books are of the same size (the currently selected one is enlarged)
When you double-click on an item, you view an enlarged copy of its cover and on the right side of the window, there are three separate tabs:
- Details – shows the detailed information of the selected item (see Figure 14).
- My Info – allows you to enter your own comments pertaining to the selected item
- Similar –explores other similar items from Amazon.com. You can purchase related items by clicking on the shopping cart icons next to each item (see Figure 15).

Figure 14. Viewing the details of a book
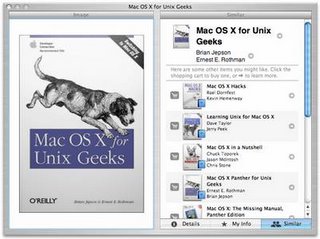
Figure 15. Viewing similar items
Another cool feature of the Delicious Library allows you to track borrower’s information. It integrates with Address Book to obtain user information. To indicate that an item is borrowed by a person, simply drag and drop the item onto the person’s name (see Figure 16). You can indicate the return date of the item by selecting the date on the right of the window (by default it is one week duration).

Figure 16. Tracking borrower’s information
When an item is overdue, it will be indicated on the book with a red stripe over the item (see Figure 17).
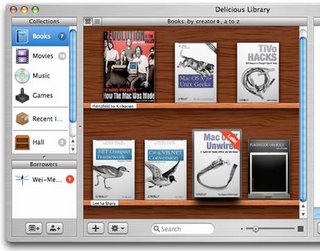
Figure 17. Late items are flagged
Final Thoughts
Overall, I like Delicious Library very much. It makes cataloguing your books and other collections such a fun thing to do. But what really makes the Delicious Library stand out is its innovative use of iSight (or Webcam) for barcode scanning, and its cool use of graphics really adds to the pleasure of using this application. Enough of this, I got to go and scan the rest of my library now!
Subscribe to:
Posts (Atom)